AWS University Project
- Esky Man
- Nov 28, 2023
- 4 min read
Updated: Jan 27, 2024
In one of my University projects this year we are tasked with setting up a basic AWS infrastructure. Let's take a look at the questions and my answers with screenshots.

Image generated by GPT4 Dall-e
The Scenario:
Erfys Confection is pleased with your research and analysis of their current cloud requirements (Assignment 1). To fully commit to the cloud migration the board members would like to see a working proof of concept. Perform the following tasks to demonstrate the benefits of cloud adoption.
Task 1: List functions, benefits and differences of cloud services
After comparing the functions and benefits, list your recommended AWS services based on A1 Confectionary’s cloud service requirement and justify with reasons?
Vertical scaling or horizontal scaling
Virtual machines or Physical machines
Relational database or data warehouse or no SQL databases
self-hosted or managed or cloud-native database solutions
Block storage and object storage
archive storage and network filesystems storage


Task 2: Implement Cloud User
Accounts and restricted access
Below are the tasks you need to implement on your AWS account or LMS environment. For each step, you are required to provide a screenshot of each task.
Scenario: As a proof of concept before migration, your manager would like to see the implementation of cloud users and groups. The following new user accounts and groups have been created in the AWS account. You need to give access to new staff depending upon their job function:
Users
In Group
Permissions
user-1
S3-support
Read-Only access to Amazon s3
user-2
EC2-Support
Read-Only access to Amazon EC2
user-3
EC2-Admin
View, Start and Stop Amazon EC2 instances
Following the organisational requirements, complete the following tasks (Lab 1):
Add user-1 to the S3-support Group
Add user-2 to the EC2-Support Group
Add user-3 to the EC2-Admin Group
Test user access: Sign in as each user and test their access permissions
Check whether the default AWS Password policy is enabled or not
All users with the group assigned

All user accounts are to be logged in with the management console and their access permissions

User 1 logged in and showing S3 permissions

User 2 logged in to management console, viewing EC2 instances (there aren’t any to view here as this lab was started for purposes of completing this part of the assignment)

User 3 logged in

AWS Password Policy Screenshot

Task 3: Create AWS Virtual network and Security settings
As a proof of concept before migration, your manager would like to see a simulated environment to test all functions and features.
1. Implement a multi-tiered network capable of supporting auto scaling (Lab 2). See network diagram below (Fig.2):

You need to:
· Set up a VPC (Virtual Private Cloud) network
· Create one virtual network and inside the network create 2 public and 2 private networks.
· Assign Public/Private subnets to the related routing table associations based on requirements.
· Create a security group that only allows HTTP and HTTPS to access the public network.
ANSWERS
Subnet Name
IP Address Range
Availability Zone
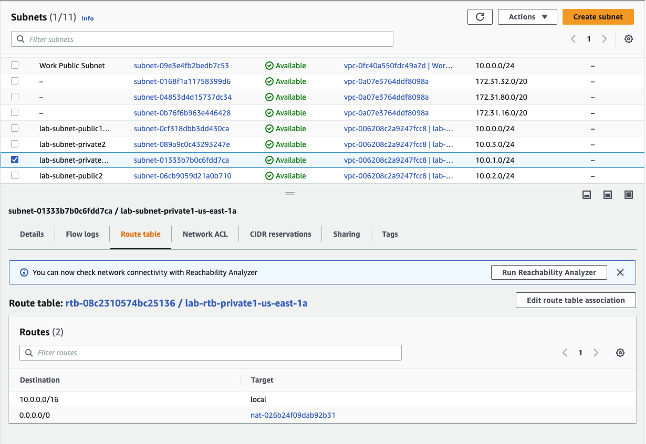
Routing Table screenshot
Subnet screenshot
Lab-vpc
10.0.0.0/16
N/A
N/A
Public Subnet 1
10.0.0.0/24
US east 1e
Private Subnet 1
10.0.1.0/24
US east 1a
Public Subnet 2
10.0.2.0/24
US east 1b
Private Subnet 2
10.0.3.0/24
US east 1b
LAB VPC - Screenshot

Public subnet t1 - route table screenshot and subnet screenshot


Private subnet t1 - route table screenshot and subnet screenshot


Public subnet t2 - route table screenshot and subnet screenshot


Private subnet t2 - route table screenshot and subnet screenshot

Insert a screenshot showing the security group.

Insert the screenshot of routes for all your routing tables

2. Create virtual machines:
For test purposes, the ITWorks manager needs you to set up a virtual server according to the business requirements.
Configure the following (Lab 3):
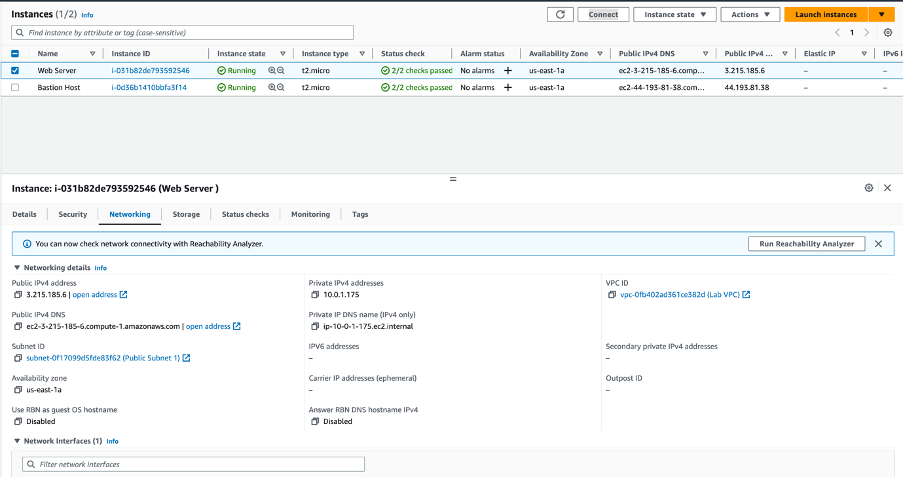
· Launch a web server with termination protection enabled. Choose Amazon Linux as the Operating system (Choose Free tier eligible option, for example, t2.micro or t3.micro).
· Monitor Your EC2 instance
· Modify the security group that your web server is using to allow HTTP access
· Test your HTTP access from your home/class PC and take screenshots.
Insert your screenshots below:
EC2 console with public IP address and availability zone

Security Groups with rules allow HTTP and HTTP

Successful web access page from your computer
3. Add additional storage and make storage expandable.
Erfys Confectionary wish to test storage functionality.
Conduct the below tasks (Lab 4):
· Create an Amazon EBS volume
· Attach and mount your volume to an EC2 instance
· Resize the EBS Volume: Increase the EBS storage size from 1 GB to 10 GB
Insert the following screenshots:
EBS page

(screen shot taken after volume resized)
EC2 instance page

df –h result in Linux CLI

EBS storage resize page (from 1GiB to 10GiB)


4. Erfys Confectionary wish to implement a highly available database. Perform the following tasks (Lab 5):
· Launch an Amazon RDS DB instance with high availability across 2 different availability zones.
· Configure the DB instance to permit connections from your web server.
· Open a web application and link to your database.
Insert the following screenshots:
Network DB security group.

Database Subnet Group

Database creation

The website successfully connects to Database (Showing address book)

5. Complete the troubleshooting table below:

Task 4: Deployment of automatic scaling
In this task, you need to configure and apply auto-scaling to the virtual machine according to the Cloud requirements section of the organisational requirements. Once it is configured, you need to test and fix errors faced in the autoscaling.
To complete this activity, you need to do the tasks below(Lab 6):
· Create an Amazon Machine Image (AMI) from a running instance.
· Create a load balancer.
· Create a launch configuration and an Auto Scaling group.
· Automatically scale new instances within a private subnet
· Update Amazon CloudWatch target tracking policy and monitor the performance of your infrastructure.
· Enable the CPU load of your VM and check that 2 to 5 instances are created.
· Test autoscaling and fix errors
Final stage diagram Fig.3:

Insert your screenshot for each request below:
Created AMI image

Load balance status page with DNS name

Launch configuration status page

Auto scaling groups detail page

Target Tracking policy page

Open Load balance DNS name in the browser

Enable CPU load

CloudWatch In alarm state after loading CPU on the webpage

At least 4 instances created on Auto scaling groups instance management page

Complete the troubleshooting table below:


